- 1. Set the Size for an Offering Envelope
- 2. Add Your Image
- 3. Add Your First Text Box
- 4. Add an Information Form
- 5. Label Elements in the Selection Pane
- 6. Align and Distribute the Text Boxes
- 7. Add Lines to Your Information Form
- 8. Align and Distribute the Lines
- 9. Look Over and Adjust
- 10. Save and Print Your Christmas Offering Envelope!
Christmas is a great time to give back to God. Make this Christmas season a special one by creating your own Christmas offering envelope for your church.
Follow this tutorial to recreate the one we made, or use these steps to make a design of your very own. Happy designing!
1. Set the Size for an Offering Envelope
Start with a new document and set the document size to the size of the offering envelope you want to print.
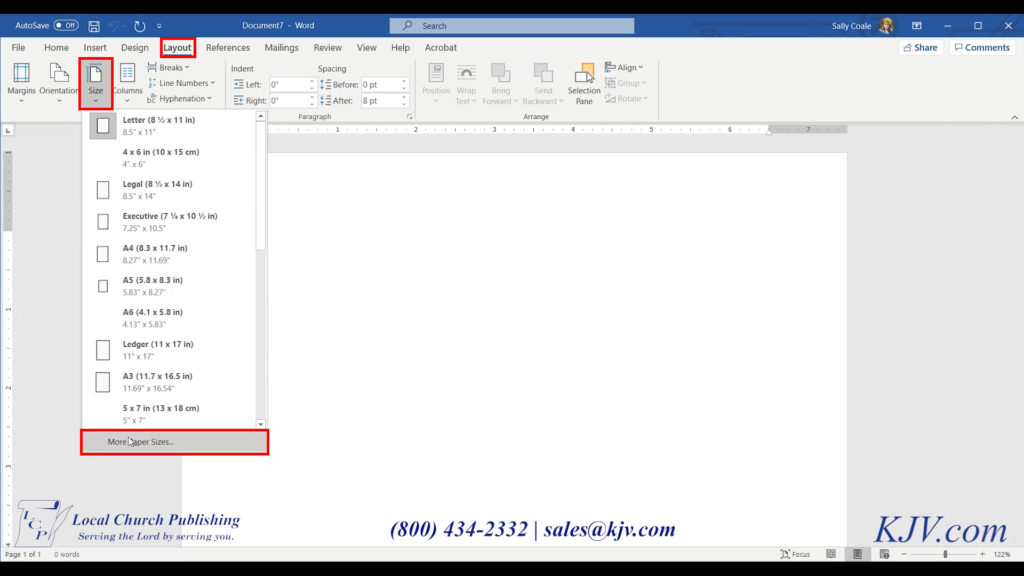
Click on the Layout tab. On the Page Setup section on the left side, you’ll find the Margins and Size options. To set the dimensions of your offering envelope, click Layout > Size > More Paper Sizes…
Type the length and width of your offering envelope in inches and then click OK. Your document preview will be resized to the size of your envelope.
Next, we need to change the margins. The margins are set to 1” by default, and that doesn’t leave much space to add content to your envelope. Click Margins > Custom Margins… then set the margins to be .125” on all 4 sides.
Don’t worry about any of the other options in the margins box, click OK. Word may re-adjust the margins to .13” due to rounding, and that’s fine.
Related Article: Christmas Giving Campaign: How to Plan, Promote, and Execute
2. Add Your Image
Now we will add an image to the envelope.
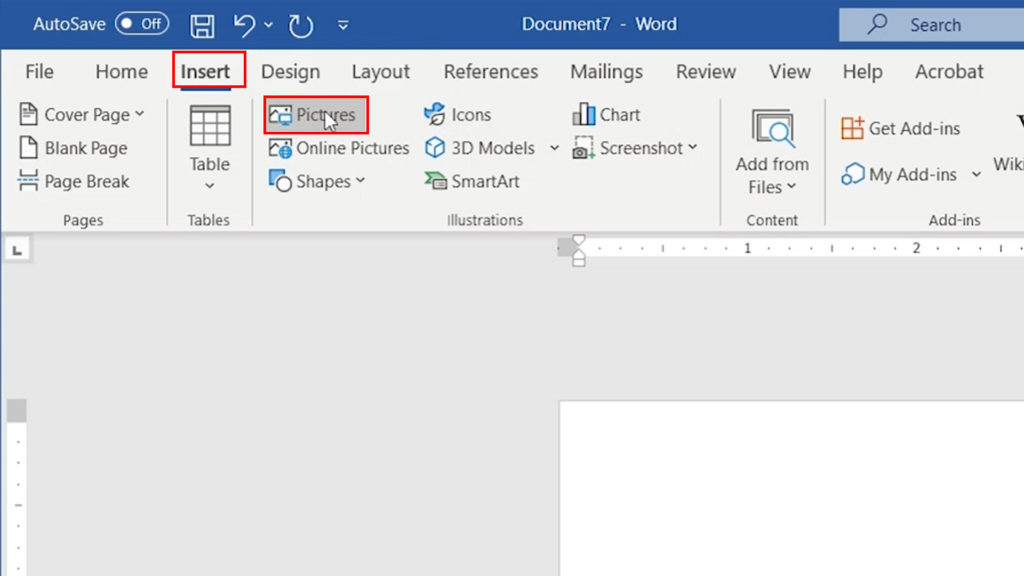
Click on the Insert tab. In the Illustrations section on the left side, you will see the Pictures option. Click on Pictures, a dialog box will pop up. Select the picture you want to use on your envelope, and click Insert.
You can find the image we used here.
Resize the image to fit your offering envelope.
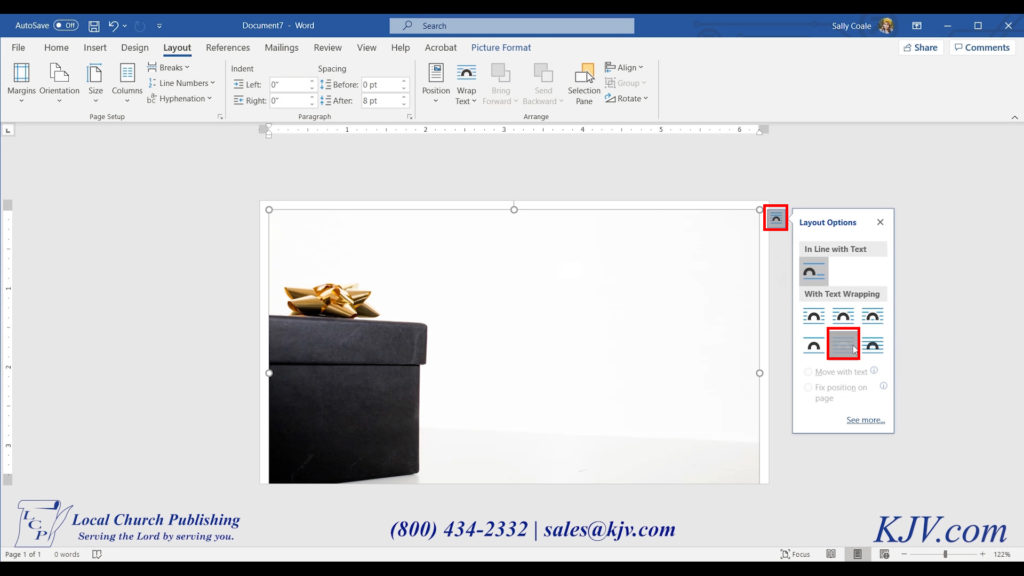
The image is automatically set to stay within the margins, but you may want to resize your image beyond the margins. To do this, click on the Layout Options box that displays near the upper right corner of your image.
This will bring up a small box of options that determines how your image interacts with your document, text, and other images and elements you place on your envelope. Select the bottom middle option Behind Text. Now your image is not constrained to say within the margins, and you can place text and other elements on top of your image.
Click and drag the corner of the image to resize it on your envelope.
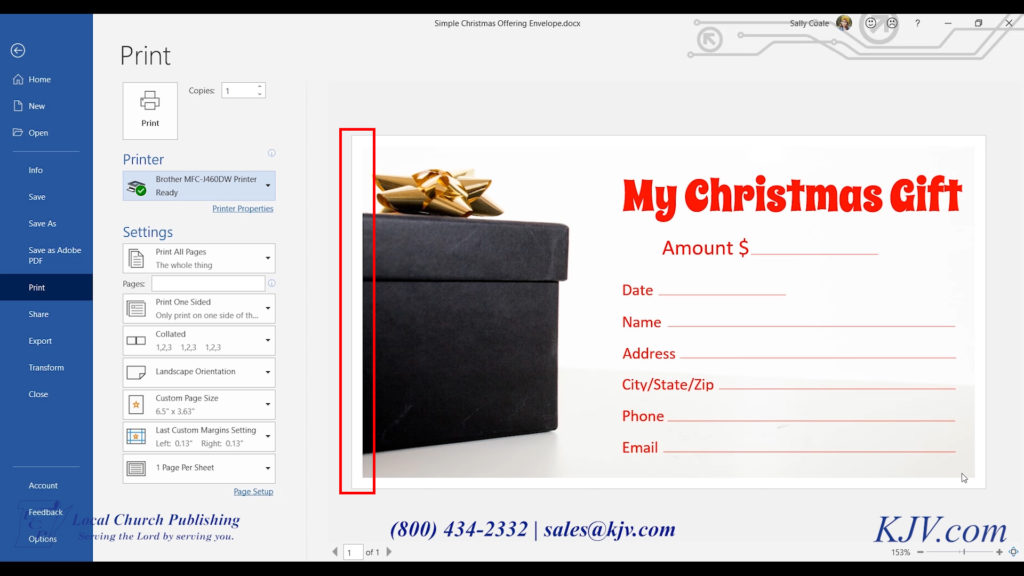
One thing to think about when setting up your envelope is how you will print it. If you plan to print this on your desktop printer, you will most likely have a white border all the way around your envelope. This is because most desktop printers cannot print all the way to the edge, or what is called “full bleed”. You will only notice this if you set up your envelope with elements all the way to the edge of your envelope.
If you would like full-bleed printing, we can print your envelope for you. You can set up an order with your own design here.
3. Add Your First Text Box
Now that you have your image on your offering envelope, we can start adding your text.
Click on the Insert tab. In the Text section on the right side, you will see the Text Box option. Click Text Box > Draw Text Box.
Now click, drag, and release to draw your text box. Text boxes are drawn with an outline and a fill. If you want an outline and fill, you can leave it has it is. But if you would like to remove the fill and outline from your text box, right-click on the text box outline. A dialog box will pop up with some options. Click Fill > No Fill, then Outline > No Outline.
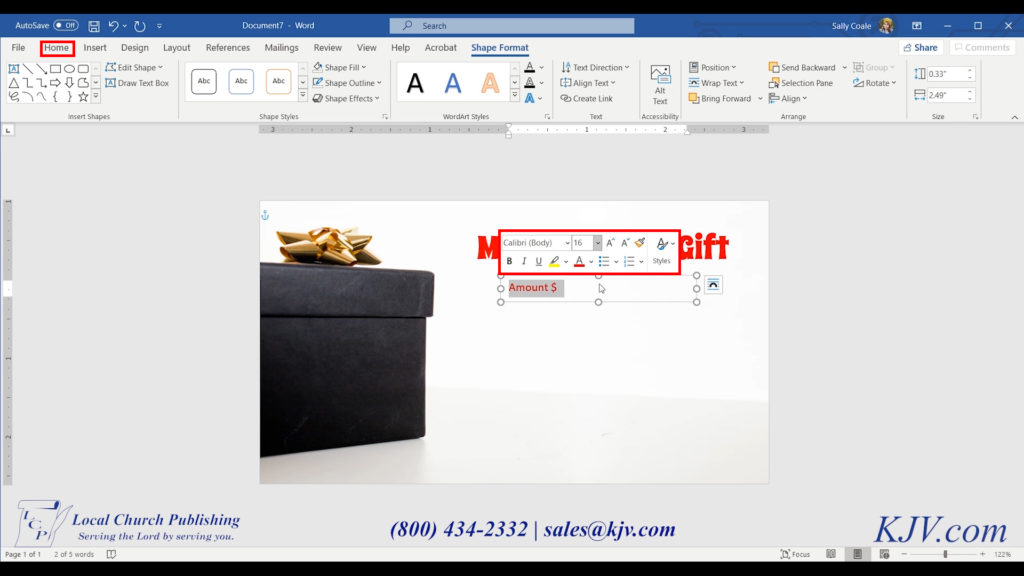
Now click inside the text box and type your text. Click and drag to highlight the text, and a dialog box will pop up with options to change the font, font size, and font color. You can also change these options from the Home tab in the Font section on the left. Set the font as you like.
We used a Google font called Spicy Rice, you can find it here
4. Add an Information Form
Information forms are a great addition to any offering envelope, as they give you the opportunity to collect information from visitors. You can use this information to follow up or add them to your church mailings.
Add another text box following the steps shown above. The text size should be smaller than the text used as the title.
Copy and paste the text box; on your keyboard, press Ctrl+c to copy, then Ctrl+v to paste.
Double-click inside the new text box and type the second line of text on your information form.
Do this for each line of text you want on your information form. Do not worry about placement yet, we will align and distribute them in step 6.
5. Label Elements in the Selection Pane
A great tool to use when you design anything in Word is the selection pane. With the selection pane, you can easily select and move elements on your design. This is especially useful when you have elements that overlap or small elements that are hard to click and grab with the mouse like a line.
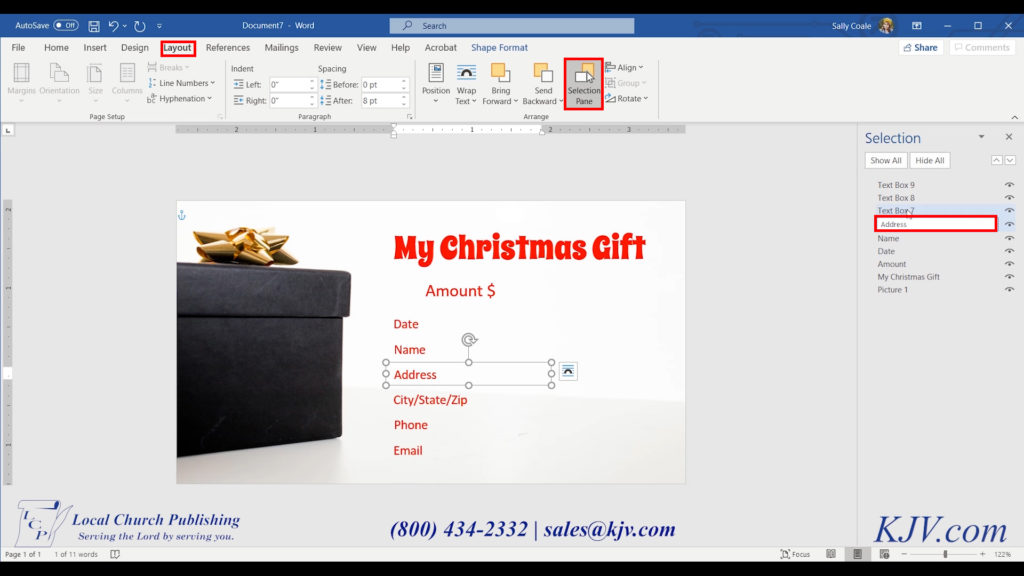
You can find the selection pane on the Layout tab. In the Arrange section in the middle, you will see Selection Pane. Click it and the Selection Pane will open on the right side of the screen.
Double click each element in the selection pane and name it. Then name each new element as you add it to your envelope.
6. Align and Distribute the Text Boxes
Select each text box text together so you can align them.
If you are selecting them from the selection pane, hold Ctrl as you click the text title in the selection pane for each box. If you are selecting them straight from the envelope, hold Shift as you click each one.
When they are all selected together, you can align and distribute them.
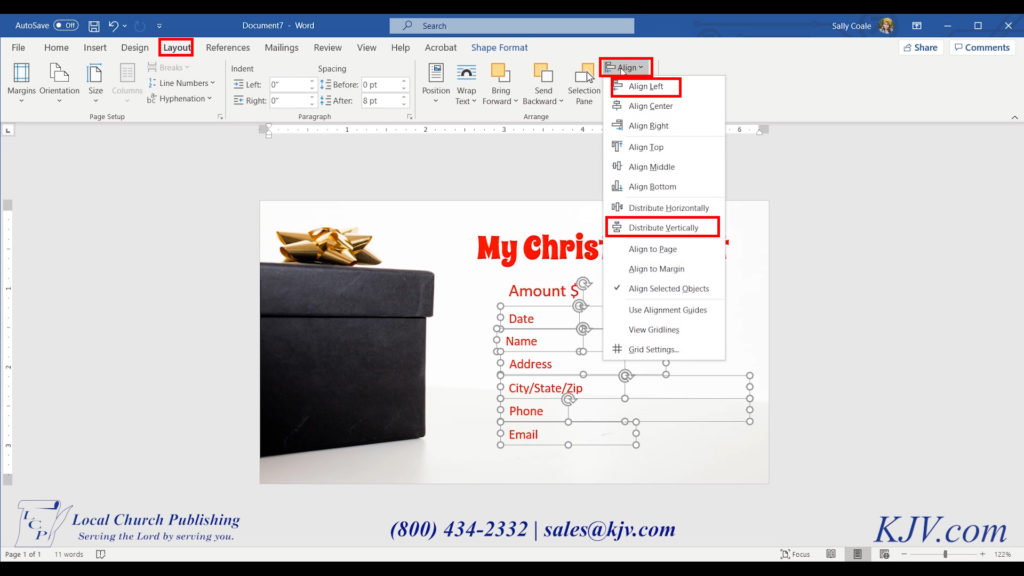
Click the Layout tab. On the Arrange section next to the Selection Pane and click Align > Align Left and Align > Distribute Vertically.
While they are still selected together, move the text boxes around with the arrow keys until you are happy with their placement.
7. Add Lines to Your Information Form
There are 2 ways you can add the lines to your information form. One way is to add them to the text box after your text. To do this, use the underscore key on your keyboard by holding Shift and pressing the dash or hyphen key (-), located directly after the 0 on your keyboard. Holding Shift while you press this key adds small sections of a line.
Although this is the easy way, it is not the best way to add the lines to an offering envelope for 2 reasons; first, you can’t make the ends of the lines on the form line up. And second, you can’t control the weight (thickness) of the lines, and when printed, the line is very thin.
The best way to add the lines to your offering envelope is to draw a line.
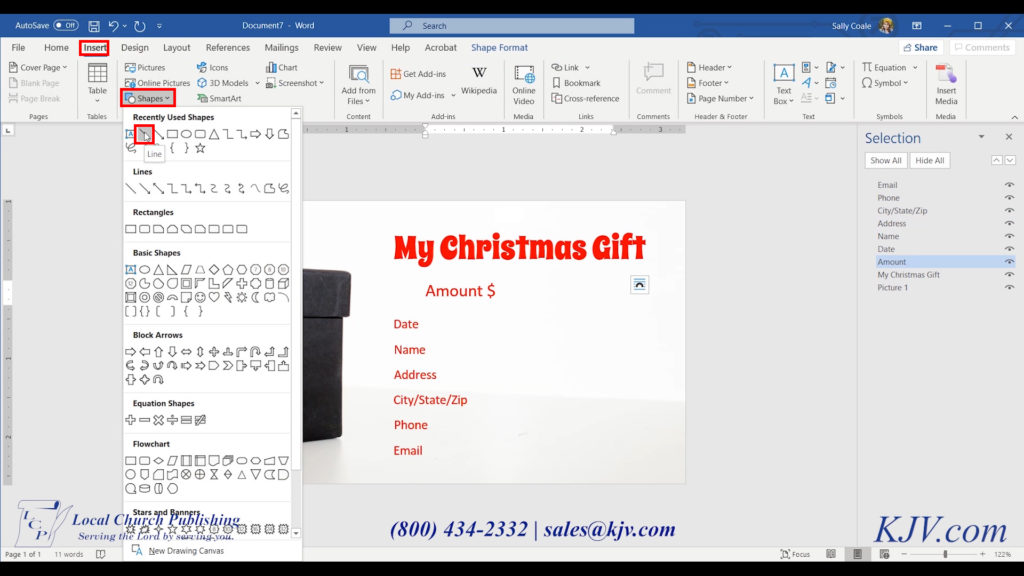
Click the Insert tab. On the Illustrations section near the left side, you will see the Shapes option. Click Shapes > Line.To draw a line, click and drag to your desired length, hold Shift to make the line horizontally straight, and then let go of your mouse button.
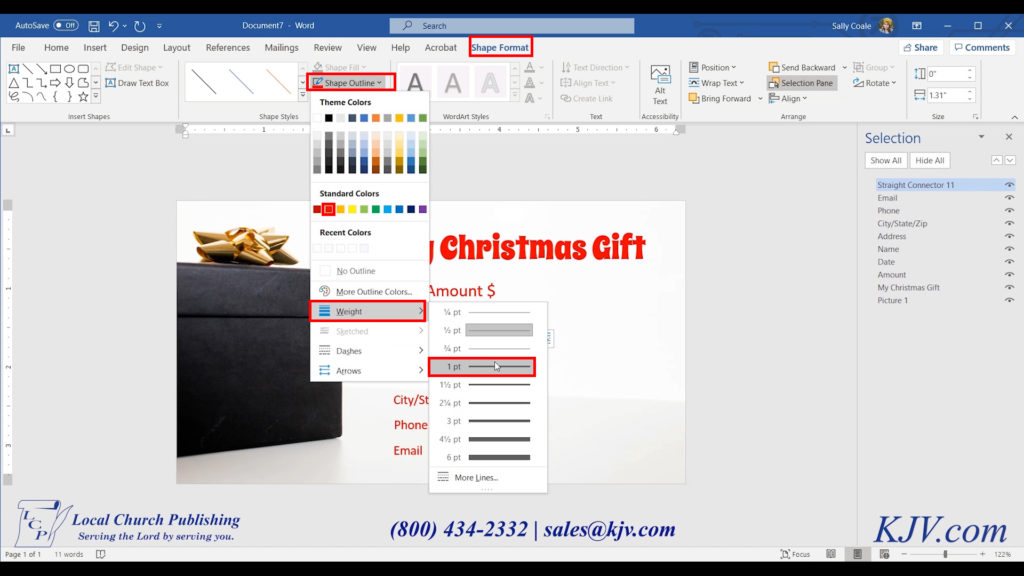
Change the color and weight of your line from the Shape Format tab which will appear in the center while the line is selected.
In the Shape Styles section near the left, you’ll see the Shape Outline option. Click it, then select your color, and set the line Weight to 1pt.
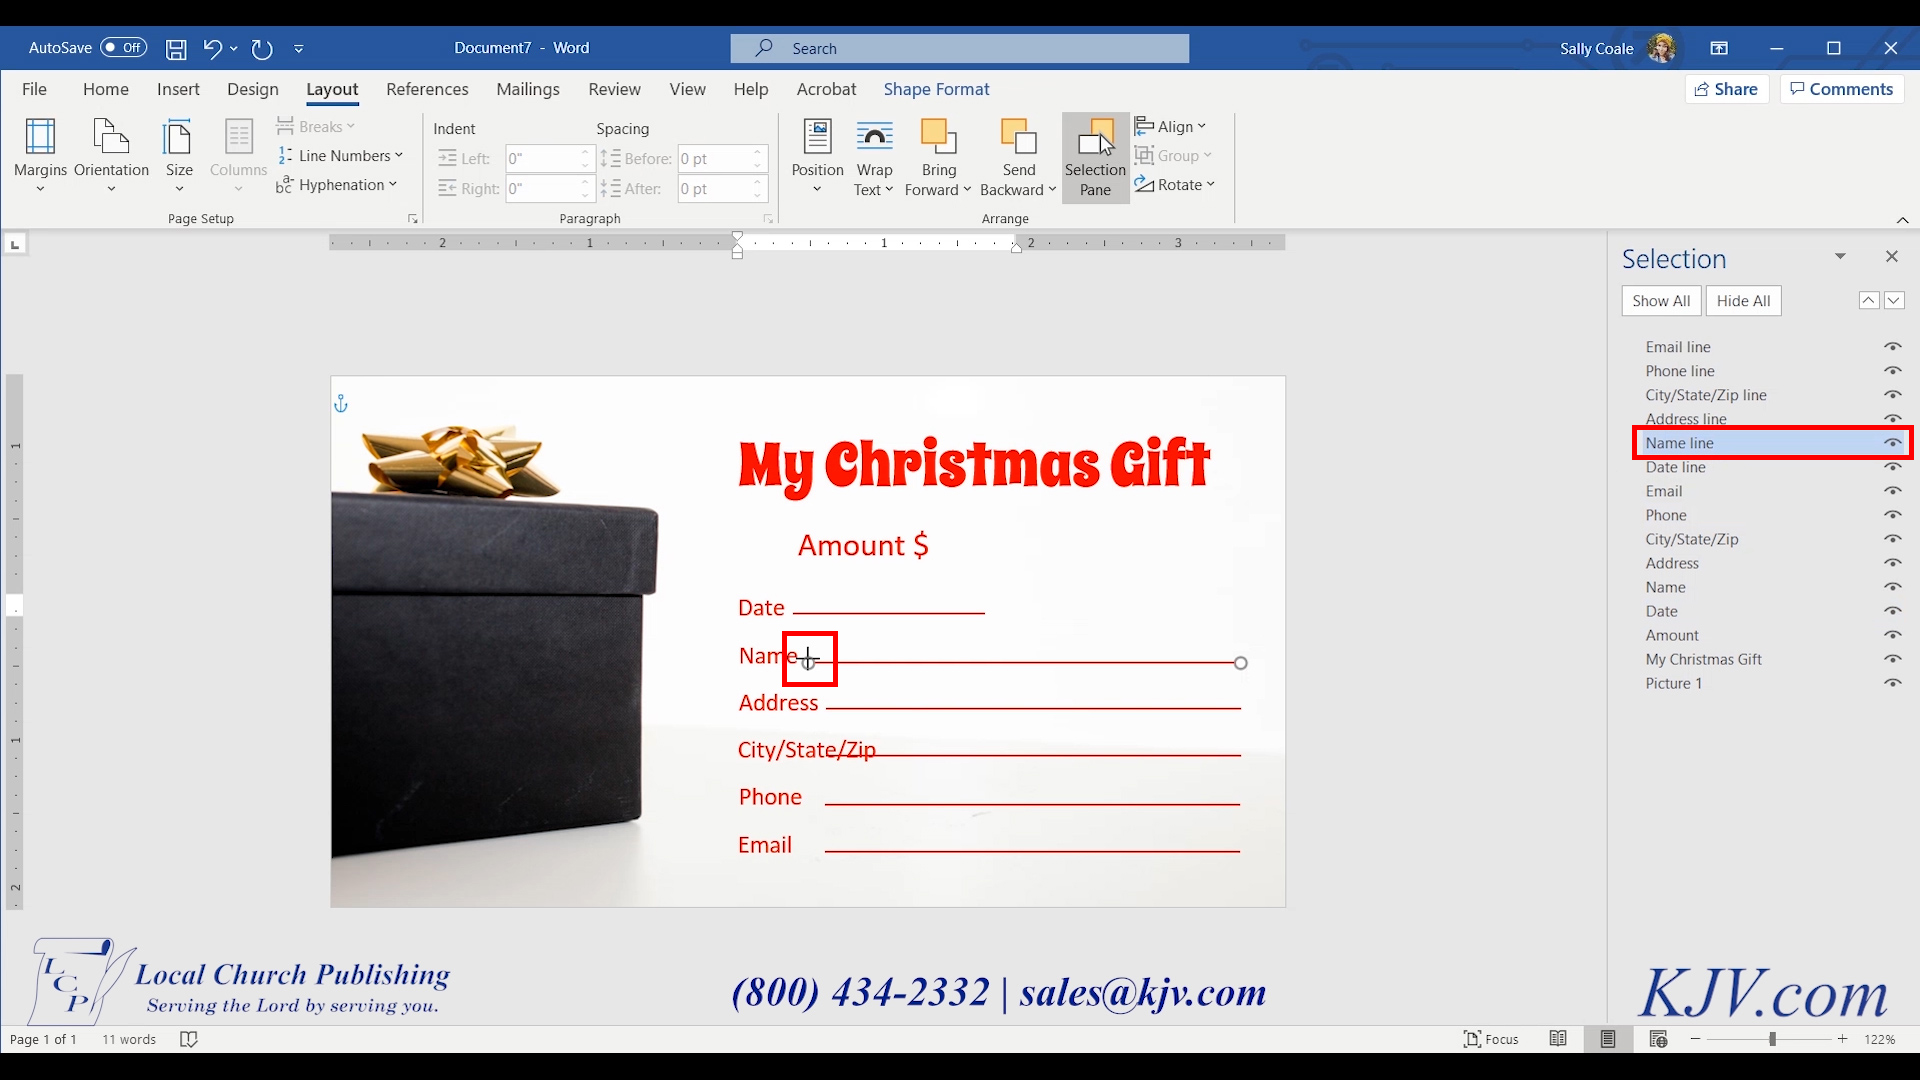
Remember to name the line in the selection pane so the next few steps will be easier.
Copy and paste the last line by selecting it from the Selection Pane and pressing Ctrl+c, and then Ctrl+v. Do this for each line you want to add to offering envelope.
Move the lines around using the arrow keys, as it is hard to select and drag them with your mouse. You don’t have to line them up perfectly at this point, we will align them next.
Related Article:Offering Envelopes: How to Design Offering Envelopes in Publisher
8. Align and Distribute the Lines
Follow the instructions from step 6 to align and distribute the text boxes, except align them to the right this time. Use the arrow keys to position them where you want them on the envelope.
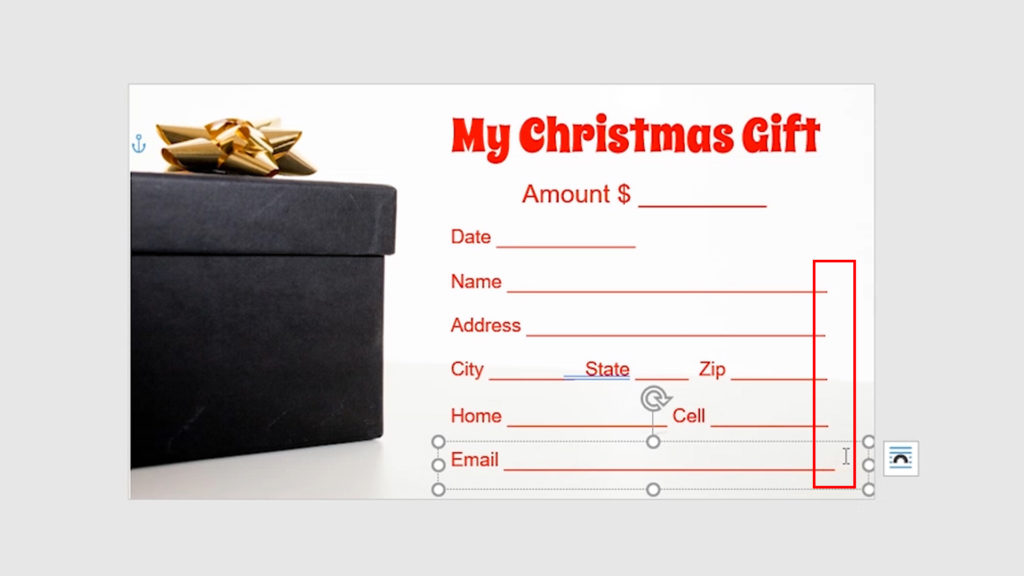
After aligning right, the left end of some lines may be too long or too short. In either case, adjust the left side of the line by clicking and dragging the connector at the end of the line. Hold Shift as you drag to lock the line straight. Do this for each line. Remember to select each line from the Selection Pane as they are difficult to select with the mouse.
9. Look Over and Adjust
Check your envelope for typos. If you added an address or phone number to your envelope, it is especially important to make sure those are correct.
Make sure that the overall envelope looks nice and everything is aligned well.
10. Save and Print Your Christmas Offering Envelope!
Click File > Save > Browse and select a location to save your envelope. Name it something you’ll remember and save it somewhere you won’t lose or forget it.
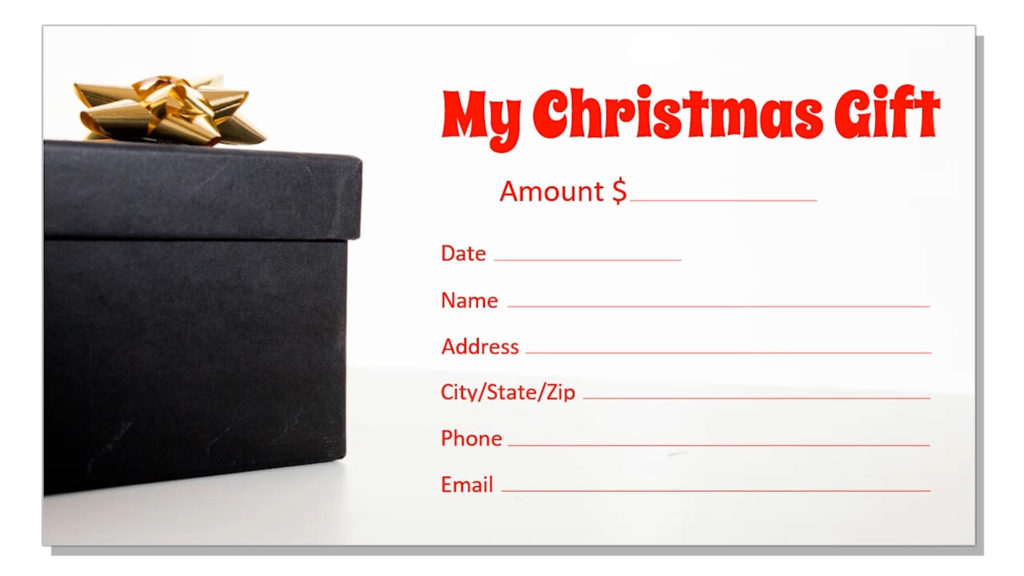
Congratulations on designing your simple Christmas offering envelope!
Now you can print your envelope on your desktop printer, or send it to us as print-ready artwork, and we can print it for you.
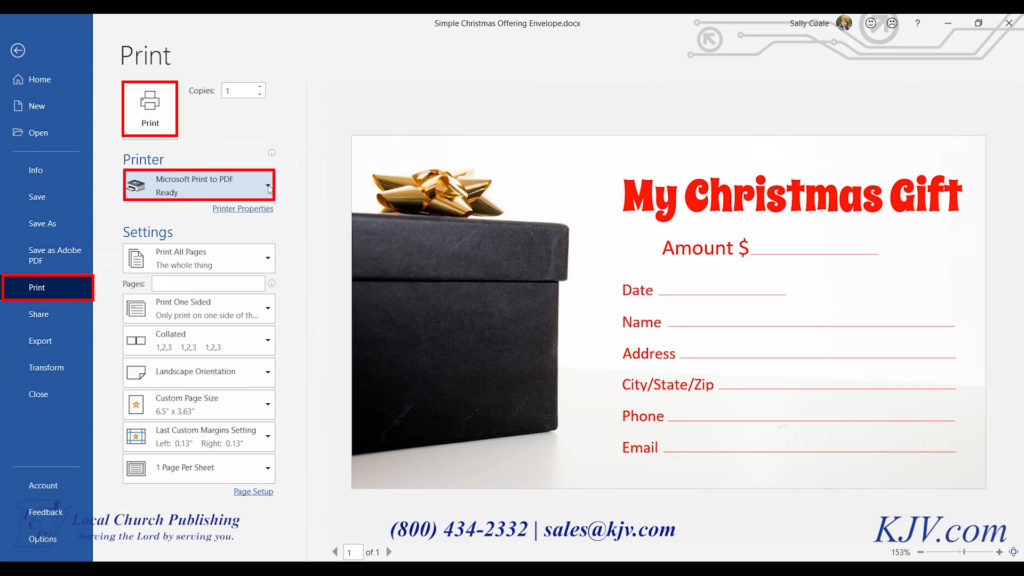
Use Microsoft Print to PDF to print, and send us the file, and we can print your envelopes full color and full bleed.
If you would like us to print your Christmas offering envelopes, print your document to a Microsoft PDF. Click File > Print > Printer > Microsoft Print to PDF > Print. Then upload the PDF when you place your order. We will email you a sample before we print your order.
Thank you for taking the time to read our tutorial. We hope you found it helpful.
Check out some of our Christmas offering envelopes, door hangers and postcards here!
