When you are finished with this article, you will be able to easily design your own offering envelopes in Word. Then you can either print them yourself on your desktop printer or submit your design to a print shop for printing.
- Step 1. Create a New Document
- Step 2. Set the Margins
- Step 3. Decide on the Orientation
- Step 4. Remember to Save Your Offering Envelope!
- Step 5. Import your Logo
- Step 6. Add Text to Your Offering Envelope
- Step 7. Format Your Text
- Step 8. Use the Line Tool
- Step 9. Aligning Content
- Step 10. Check Your Work!
- Step 11. Save Your Envelope as a Template
- Step 12. Print Your Offering Envelopes
- Step 13. More Helpful Tips
- Step 14. Free Offering Envelope Templates
Before you get started, we recommend that you take a look at our previous offering envelope article, Offering Envelopes: How to Design Your Own, in which we explain how to decide on the content of your offering envelope, and go over some design basics.
1. Create a New Document
First, open Word and create a Blank document. Next, change the size of the document to the size of the offering envelopes you will be using. Layout > Page Setup > Size.
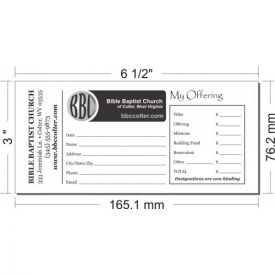
To change the size, click More paper sizes…, and enter the dimensions of the envelope. A common envelope size used for offering envelopes is the 6 3/4 which measures 6.5″ x 3.625″.
2. Set the Margins
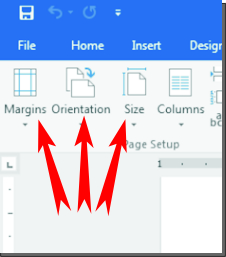
By default, the margins are 1″, but that wastes a lot of space on the already small print area. A margin of .25″ on all sides will usually work for most printers. Layout > Page Setup > Margins > Custom Margins
3. Decide on the Orientation
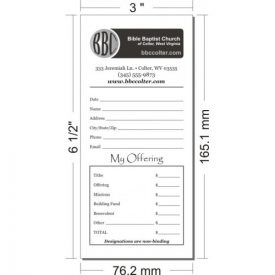
Some churches have offering envelopes with a vertical (portrait) design. This makes them easier to read while they are in the pew rack. The more common orientation for offering envelopes is horizontal (landscape). Decide what works best for you. Layout > Orientation > Portrait or Landscape
4. Remember to Save Your Offering Envelope!
If something happens to your computer while you are working on your offering envelope, you certainly don’t want to lose all that time you put into it. Save your envelope somewhere you will easily find it again, and save it often while you are making changes.
Tip: The keyboard shortcut for save is Ctrl+s.
5. Import your Logo
If you have a church logo, or other artwork you would like to use, import it. Insert > Illustrations > Pictures. If you need to resize it, do this by clicking and dragging the corner. Be sure to hold down shift while you drag, this will keep your image proportional. After resizing, place it where you wish.
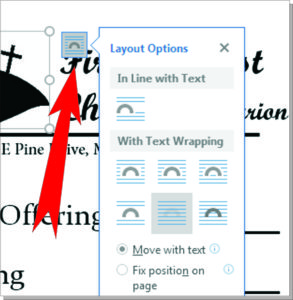
When the image or logo is selected, a Layout Options tab will appear to the right of the object. Select Behind Text, then click Fix position on page. By doing this, your image/logo will not get moved around when text is placed near it. You can even put text on top of it and it will not move.
6. Add Text to Your Offering Envelope
When adding text to your envelope, do not use the space bar, enter, or tab to get the I-beam where you want to input text. If you do this, any change you make to the text (font, size, or spacing) will shift everything around. It will cause you a lot of problems, and a lot of time fixing it.
Instead use a separate text box for every area you want to place text. If you plan to have an information form on your envelope, you may either use a separate box for each word (date, name, address), or use one box, and use the tab and enter to space the words appropriately within the text box.
If you would like to use separate text boxes for every word, you can use the align tool to make sure they line up nicely. Right now it is important to get everything onto the offering envelope approximately where your want it.
To draw a text box, click Insert > Text > Text Box > Draw Text Box. Click where you would like to place the text box, and drag to the size you need.
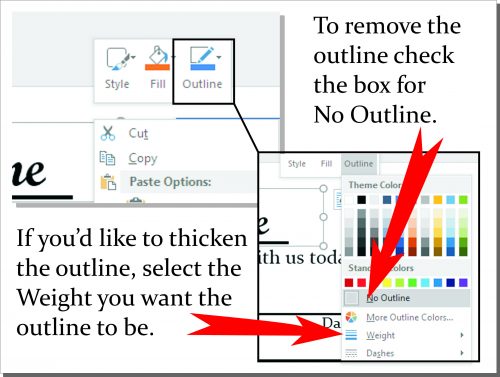
Text boxes automatically have a white fill with a black border/outline. If you like the look of it, you can leave it that way. To change or remove the fill and outline, right click the edge of the text box, then click Fill > No Fill, and Outline > No Outline.
7. Format Your Text
You can play around with the font, font size, and font color to see what looks good. Generally, you don’t want font to be much smaller than 10 pt so it’s easy to read. Click the text box you want to make the changes to, then click the Format tab to see more options. It is better to stick with a font that is simple and eye appealing than to use some of the newer WordArt Styles, or Theme Styles that are available on the Format tab. But if that is the style you are looking for, go for it!
8. Use the Line Tool
There are a couple reasons why you shouldn’t use the underscore key on the keyboard to make blank spaces for writing on. First of all, they will shift around when you are formatting text, and you will end up having to fix them over and over again. Secondly, you will not be able to control the thickness of your lines, and they will print very thin, and sometimes with dashes. Whether you just want a place for a name, date and amount, or a full information form, it is best to either use the line tool, or draw a box where you want information written. Insert > Shapes > Line or Insert > Shapes > Rectangle
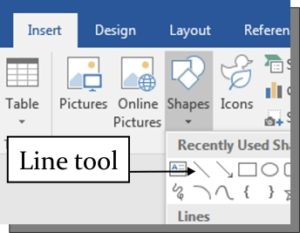
To draw a straight line, hold down the shift key while you drag, and the line will be locked straight. Then all you need to do is drag to your desired length. Once you click off a line, it is a little difficult to select it again because the lines are so thin. The Selection Pane comes in handy for selecting and moving the lines.
If you need several lines that are the same length, copy and paste them. Ctrl+c is copy, and Ctrl+v is paste.
9. Aligning Content
Some elements can be difficult to select with your mouse, especially thin lines, or overlapping objects. An easier way to select objects is by opening the Selection Pane. Layout > Arrange > Selection Pane The selection pane is a list of all the objects and text boxes on your page. Click on the list to select one, or hold down shift and click to select multiple objects.
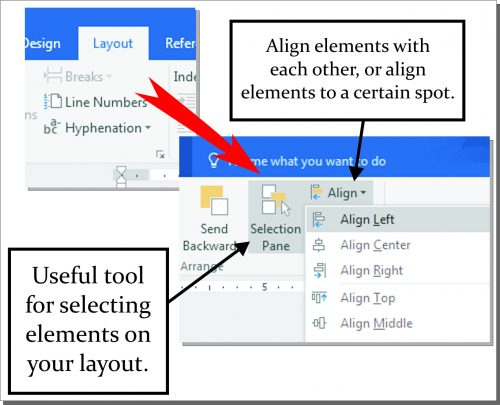
To align elements to one another, distribute them evenly, or align them to a particular place on the page. Begin by selecting the elements you want to align. Hold down Shift (Ctrl if you are using the Selection Pane) and click all the objects you want to align so that they are all selected. Then go to Layout > Arrange > Align > choose how you want the elements aligned.
If you want to move multiple objects together, make sure they are all selected. Then you can move them as one using the arrow keys, or by clicking and dragging the group.
10. Check Your Work!
Nothing is worse than printing your material only to find an overlooked error. Not only do you end up with a big batch of wasted offering envelopes, but the hours you spent preparing it are wasted as well. Take your time to carefully look over your work before you send it off to the printer. Be sure that spelling is correct, elements line up with one another, and the layout as a whole is appealing.
Even with the small amount of text on an offering envelope, it is not difficult to miss a spelling error. Pay particular attention to any numbers – phone numbers, street address, or PO box – as these are the easiest mistake to miss. Check it, check it, and check it again. Have someone else take a look at your envelope as well, just to make sure. Word has a spellchecker, but it can still miss the wrong word being used.
11. Save Your Envelope as a Template
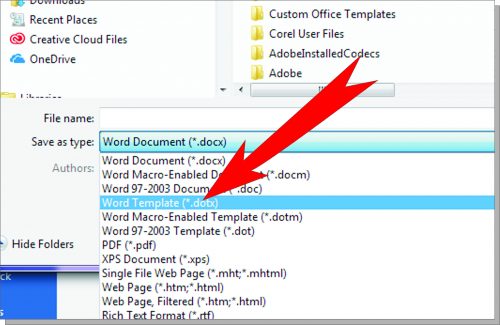
At this point it is a good idea to save your envelope as a Word Template. This way you can easily access it if you want to change anything. Save As, then select the folder to save to, name the file, and select Word Template or Word 97-2003 Template as the file type.
12. Print Your Offering Envelopes
Now you can either print your offering envelope yourself, or submit your design to a print shop. Word files are usually not compatible with the design programs used in print shops, and may need to be converted to a PDF file first. Another option is to submit your design as a mock up, and have them recreate your envelope in another program. If you contact the print shop directly, they will let you know what their process is, and what file formats they can accept. Either way, you will still have the satisfaction of designing your own church offering envelope.
13. More Helpful Tips
Whether you are new to Word, or you have been using it for years now, there are always new things you can learn. Here are some tips we hope you will find helpful while you work on your envelope.
Turn on Your Ruler
Nothing is more frustrating than trying to space out content evenly with nothing to justify it with. Turning on your ruler will make your job easier. View > Show > Guides.
Use the Selection Pane
The selection pane will show you every object on your layout in list form. This makes it so much easier to select and switch between content elements on the page. You can even name the elements so you can select the exact object you want quickly. Layout > Arrange > Selection Pane.
Keyboard Shortcuts:
- Ctrl+S = save
- Ctrl+Z = undo
- Ctrl+X = redo
- Ctrl+C = copy
- Ctrl+V= paste
- Ctrl+A= select all
- Ctrl+B = bold
- Ctrl+I = italics
- Ctrl+U=underline
- Ctrl+R=right align text
- Ctrl+L=left align text
- Ctrl+E=center align text
14. Free Offering Envelope Templates
Here are a few free offering envelope templates to help get you started on designing your own offering envelopes. We also have some here from our previous offering envelope article available for download.